Beauty Masterclass: How to Get the Perfect Smoky Cat Eye

Ace our beauty masterclass and learn the tricks of the trade from beauty editor Leila.

When you combine two classic make-up techniques: the cat eye and the smoky eye, you will achieve a sultry, powerful look. Read on and watch as we show you how.

OUTLINE YOUR WING

Using the length of a thin make-up brush as a kind of ruler, outline the shape of your wing with a light eye shadow using another brush.

FILL & BLEND OUT THE SHAPE

Apply a cream shadow along the upper lash line connecting it to the flick of the wing and then, using a fluffy blending brush, pat and diffuse the shadow to create the smoky effect you desire.

DEFINE THE LINE

Next, you need to focus on the prominent line that defines the cat eye, which is close to the lash line and should be drawn with a liquid, gel or felt-tip liner.

APPLY MASCARA

Add a coat or two to the bottom and top eyelashes to make the eyes pop.

CLEAN UP WITH CONCEALER

The final step to your look is some concealer under the eyes. Simply outline the areas that need covering with your concealer and finish by tapping the product using your middle or ring finger, until blended.

Videographer: Roice Nel. Hair and make-up: Renee De Wit/Gloss. Model: Fernanda/D&A. Production: Leila Petersen

All items subject to availability. Prices may change.

Beauty Masterclass: How To Fake The JLo Glow in 5 Easy Steps

Glowing skin for the win! Try these five easy skincare and make-up steps that will bring out your inner Jennifer Lopez.

Fact: we all want glowing skin à la Jennifer Lopez. Beauty editor Leila shares the best ways to get the JLo glow in five easy steps. 

STEP 1. START WITH AN ILLUMINATING MOISTURISER AND PRIMER

Massage clean facial skin with an illuminating moisturiser and then primer to hydrate and plump, creating the perfect radiant canvas.

STEP 2. APPLY A LIGHT, SILKY FOUNDATION

Choose a foundation that offers light yet luminous coverage for an extra layer of radiance that won’t weigh you down.

STEP 3. COVER DARK CIRCLES AND BLEMISHES WITH CONCEALER

To further create a flawless and dewy complexion, use a concealer to cover up unwanted blemishes and persistent dark circles.

STEP 4. ADD HIGHLIGHTER

Highlighter is the most important ingredient to creating the ultimate glow. The rule of thumb is to apply it to the areas of your face that the sun would naturally hit: the tops of your cheekbones, the bridge of your nose, the Cupid’s bow, and your chin. Another key area to highlight is the inner corner of your eyes; this will instantly brighten them.

STEP 5. FINISH OFF WITH A GLOSSY SHINE

Take your glow to the next level by layering some clear gloss or a shiny balm over your lids and lips.

Videographer: Roice Nel. Hair & make-up: Renee De Wit/Gloss. Model: Lovis Lena/Ice Genetics. Production: Leila Petersen  

All items subject to availability. Prices may change.

5 make-up brushes your beauty kit needs

Make-up brushes are an essential part of ensuring your make-up is flawless. We brush up on the five brushes to invest in.

Extremely versatile and easy to use, these are the essential brushes you need to create breath-taking looks. Brush up on your basics and read on.

THE FOUNDATION BRUSH

The foundation of your beauty arsenal, this brush is really a non-negotiable when it comes to creating a flawless canvas. Typically firm and wide with a slight dome shape; a foundation brush will give you more coverage and a smooth, poreless finish.

Artist tip #1
For the most natural finish, apply foundation to the centre of your face first, and extend toward your hairline.
EXCLUSIVE TO EDGARS
Beautique Foundation Brush 92.95

THE BLUSH BRUSH

Another staple in your make-up bag, a blush brush can be used for blusher, bronzer and powder. Boasting a feathery feel with ultra-long bristles, this brush is ideal for picking up and depositing blush to define, contour and shade your cheeks.

Artist tip #2
Softer bristles will create a more subtle flush while a more densely packed brush will deliver a more potent colour payoff.

Clarins Blush Brush 395

THE CONCEALER BRUSH

Dubbed the ‘magic wand’, a concealer brush tackles some of your worst beauty woes – think dark circles, blemishes and scars – in one step. A brush with a tapered head and bristles that are both firm and flexible can reach those areas your other tools (or fingers) cannot.

Artist tip #3
For the best results, apply concealer over foundation as this will ensure that the concealer wont be wiped away.

Mac Concealer Brush 355

THE BLENDING BRUSH

When it comes to eye shadow, there are so many brushes that will aid in the application of your chosen pigments but the tool that does the trick best is the blending brush. This flexible brush makes it easy to blend colours and soften lines, and is ideal for dusting eye shadow along the crease of your lids.

Artist tip #4
When applying your eye shadow, target areas around the eye, such as the inner and outer corners, with the most intense pigment.
Estée Lauder Blending Brush 495

THE DUO BROW BRUSH

It’s no secret that brows frame your face, and can really pull your beauty look together. Keep them in shape with a brush/spoolie duo. Super convenient, this brush is great for full fill-ins and precision touch-ups while the spoolie helps to distribute colour evenly and allows you to have that brushed-up brow look that’s gorgeous and natural looking.
Artist tip #5
Perfect brows start with a spoolie brush! Simply brush the hair upward to see where there is any unevenness. And then using brow powder or pencil fill in the sparse areas to ensure brows look perfectly on point.
Smashbox Camera Ready Define and Groom Brow Brush 430

WATCH: Party eye make-up tutorial

We have put together a step-by-step guide on how to nail the party eye, plus a video tutorial for the best tips.

Nothing adds a glam touch to your peepers more than luxe, jewel-toned eye shadow. Watch and learn with these easy steps below and you’ll be party ready in no time. 

1. Apply primer to your lids

Start off by prepping your lids with a primer. This gives your eye shadow something to adhere to, ensuring minimal creasing and longer lasting colour.

2. Apply and blend dark cream eye shadow 

A dark cream eye shadow applied and blended on the lid creates the perfect base before adding your pigment, as it will intensify the colour, making it look bolder and brighter.

3. Pat green eye shadow and blend

Using your ring finger, gently tap eye shadow onto your lids as this will help get a more pigmented, even layer of application than if you simply wipe the colour over your eye.

4. Apply copper eye shadow to the crease 

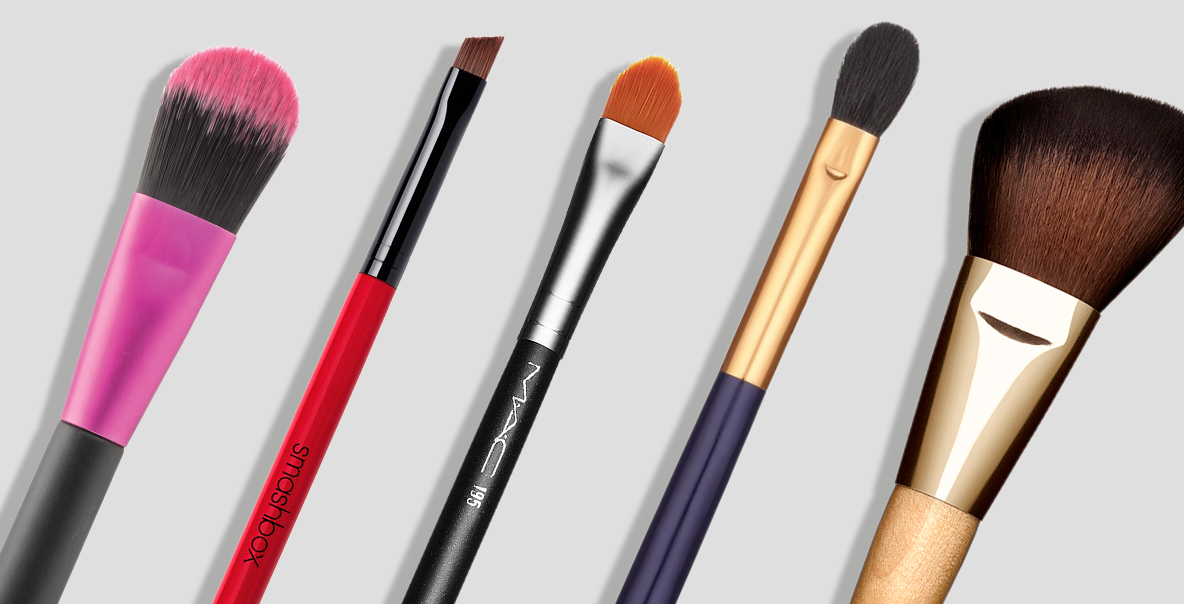
This step adds depth while softening the edges of the make-up, and allows your eyes to look bolder and bigger. When it comes to applying the colour, choose a large blending brush and gently add the colour into the crease.

5. Line your top and bottom waterline with black eyeliner

Also known as tightlining, this trick is important to intensify and define your eyes. Rest the eyeliner pencil between the roots of your lashes and carefully trace it along your upper and bottom waterline.

6. Apply cream eye shadow and copper colour to lower lash line 

The cream eye shadow creates a base on which the pigment can adhere to and helps it last longer.

7. Using a flat eye shadow brush, apply a blue-green pigment to the lower lash line

For an eye-catching look, add a second complementary jewel shade to your lower lash line. The flat eye shadow brush will allow for precision when applying and will help you create a clean, defined line.

8. Apply mascara to the top and bottom eyelashes 

To prevent your top lashes from smudging when you look down, start by first applying mascara to your bottom lashes. When it comes to the top lashes, give them a press with an eyelash curler before you coat them, as this will make your eyes look bigger. Place the wand at the base of your lashes and apply the mascara in a zigzag motion to help lengthen and volumise your lashes.

9. Place highlighter along the brow bone and the inner corner of the eye

A highlighter instantly infuses a bit of life into any make-up look. To give the illusion of larger eyes, simply apply some product under your brown bone (but above your crease). To brighten and make your eyes look more awake, add a pinch of highlighter to the inner corner of your eyes.

10. Complete your look with a nude glossy lip

With such a bold and bright look, keep the rest of your face relatively low-key with a touch of highlighter on your cheekbones and nude gloss on your lips.

Videographer: Roice Nel, hair & make-up: Renee De Wit/Gloss, model: Fabienne/Pulse Models, production: Leila Petersen

All items subject to availability. Prices may change.